


Fun outdoor science lesson ideas

As Spring and Summer approach, it is a great time to try some outdoor science lessons. After all, pupils have been cooped up indoors over Winter for far too long! Plus there are the wellbeing benefits of some fresh air and some exercise.
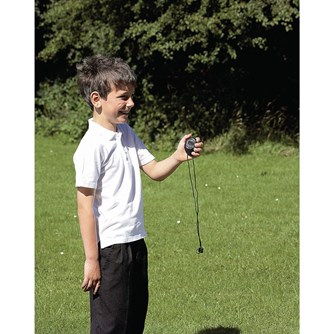
1. Investigating heart rate and exercise
This is a simple yet hands on way to investigate how the heart rate changes as we exercise.
You will need
Paper
Clipboards (optional)
How to investigate heart rate and exercise
- Start by asking pupils to measure their resting heart rate inside the classroom, by counting their own pulse beats on their wrist for 1 minute.
- Then venture to a suitable outdoor space for the students to take part in exercise for 1 minute. They could run lengths of the playground, or do star jumps for example.
- Then ask the pupils to measure their heart rate again immediately after exercise, so they can see how much it has increased.
- Pupils could time how long it takes for their pulse rates to return to normal.
2. Using string telephones to investigate how sound travels
Nice weather outside is a good opportunity to take your class outdoors to investigate how sound can travel using String telephones.
You will need:
Plastic cups
Clipboards
Pencils
Blu-Tack or similar
Plastic Cones
How to investigate how sound travels using string telephones
- First, put the pupils to work in pairs. Each pupil makes a list of 20 words with which to test their telephone.
- Then, ask the pupils to create a table, such as the one below, which will help them record their results:
| Length of string telephone | Words spoken | Words heard | Total correct words |
|
2M |
|||
|
4M |
|
||
|
6M |
|||
| 8M |
- Give each pair of pupils a ball of string, two clipboards and two plastic cups.
- Using a sharpened pencil, pierce a hole in the bottom of the plastic cup (a blob of Blu-Tack underneath the cup may help!), ready for the string to go through.
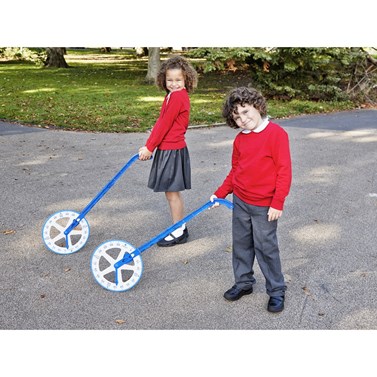
- Now take the pupils outside onto a large open area, such as the playground or a playing field.
- Measure and mark out distances across the open space. You could use cones and a Trundle Wheel for this. A good range would be 0-10M in 1M increments, or 0-20M in 2M increments, depending on the size of your outdoor space.
- The pupils can use these markers to measure the lengths of string for their telephones. The Teacher or Teaching Assistant can cut the string for them with scissors, to remove the risk involved with pupils having to carry and use scissors whilst outside.
- Pupils select and note down 5 words in the ‘Words Spoken’ column from their list that they are going to test at each distance. These words can be varied between the tests.
- Each pupil in the pair can have a go at reading their list of words to the other pupil through the string telephones. The second pupil should note down which words they think were read by the other.
- They can then mark their results using each other’s tables at the end to see which length of string worked best as a string telephone.
3. Working out the speed of sound
Working out the Speed of Sound can be carried out inside the classroom using apparatus such as our Speed of Sound Kit, but it can also be visually demonstrated in a large outdoor space, such as a playing field.
You will need
A pair of cymbals
A trundle wheel
How to work out the speed of sound outdoors
- Have one pupil take a pair of cymbals and a trundle wheel across a large field, measuring the distance as they go.
- Have another pupil hold the timer at the starting point.
- The pupil holding the cymbals is going to crash the cymbals together above their head, while the pupil holding the timer starts the timer when they see the cymbals meet and stops the timer as soon as they hear the cymbal crash.
- This can be repeated several times so that an average value can be taken.
- Pupils could discuss any possible errors too
The speed of sound can then be calculated using the following equation:
Speed = Distance ÷ Time
You can learn more about this experiment from Physics Online – Measuring the Speed of Sound – GCSE Physics
4. The egg-drop challenge
A visually impressive way to demonstrate motions and forces! Pupils must design and make an egg carrier which is to be dropped from a high window. On landing, the egg must be protected and intact. Sounds easy right?
You will need
Plus materials such as
Wadding
String
Bubble wrap
Newspaper
Cardboard tubes
…or whichever craft materials are available to hand
How to do the egg drop challenge
- Challenge the pupils to create a carrier which will help an egg land safely and intact after being thrown from a high window.
- This could be set up as a ‘commercial’ type activity where the pupils are given a ‘budget’ to work to. The class are provided with a core set of tools, such as scissors and 1 roll of sticky tape. They are also allowed to ‘purchase’ various priced materials, sticking to their budget in order to build their egg carrier.
- Ask a Science Technician or Teaching Assistant to help by throwing the finished egg carriers from the window, so that no pupils are close to open windows.
- Pupils can be at ground level with the Teacher to see their end result, once their egg hits the ground.
- There could be discussion around which format and materials make the best egg carrier.
Always take care when carrying out the Egg-Drop from a height
Get advice about outdoor science activities
If you have any questions about setting up outdoor science activities, please contact our Technical Support Team via techsupport@philipharris.co.uk


