Investigating microbial growth A Level Biology
During this investigation, students are going to investigate the effects of antimicrobial substances on the growth of bacteria. They are also going to carry out a serial dilution of a bacterial culture to see how bacterial concentration affects growth.
A large amount of advanced planning and preparation are required in order to ensure that all of the required equipment, media and bacterial cultures are prepared, active and fresh. Access to an autoclave is imperative here in order to sterilise media and equipment and to destroy the resulting bacterial plates, and access to an incubator is also required to produce the bacterial cultures required by the students and to develop their bacterial lawn plates.
A good working knowledge of Aseptic Technique should be instilled to students. They are assessed on this along with their ability to safely use the equipment and the safe handling of microorganisms.
Subject: Biology | Level: A Level |
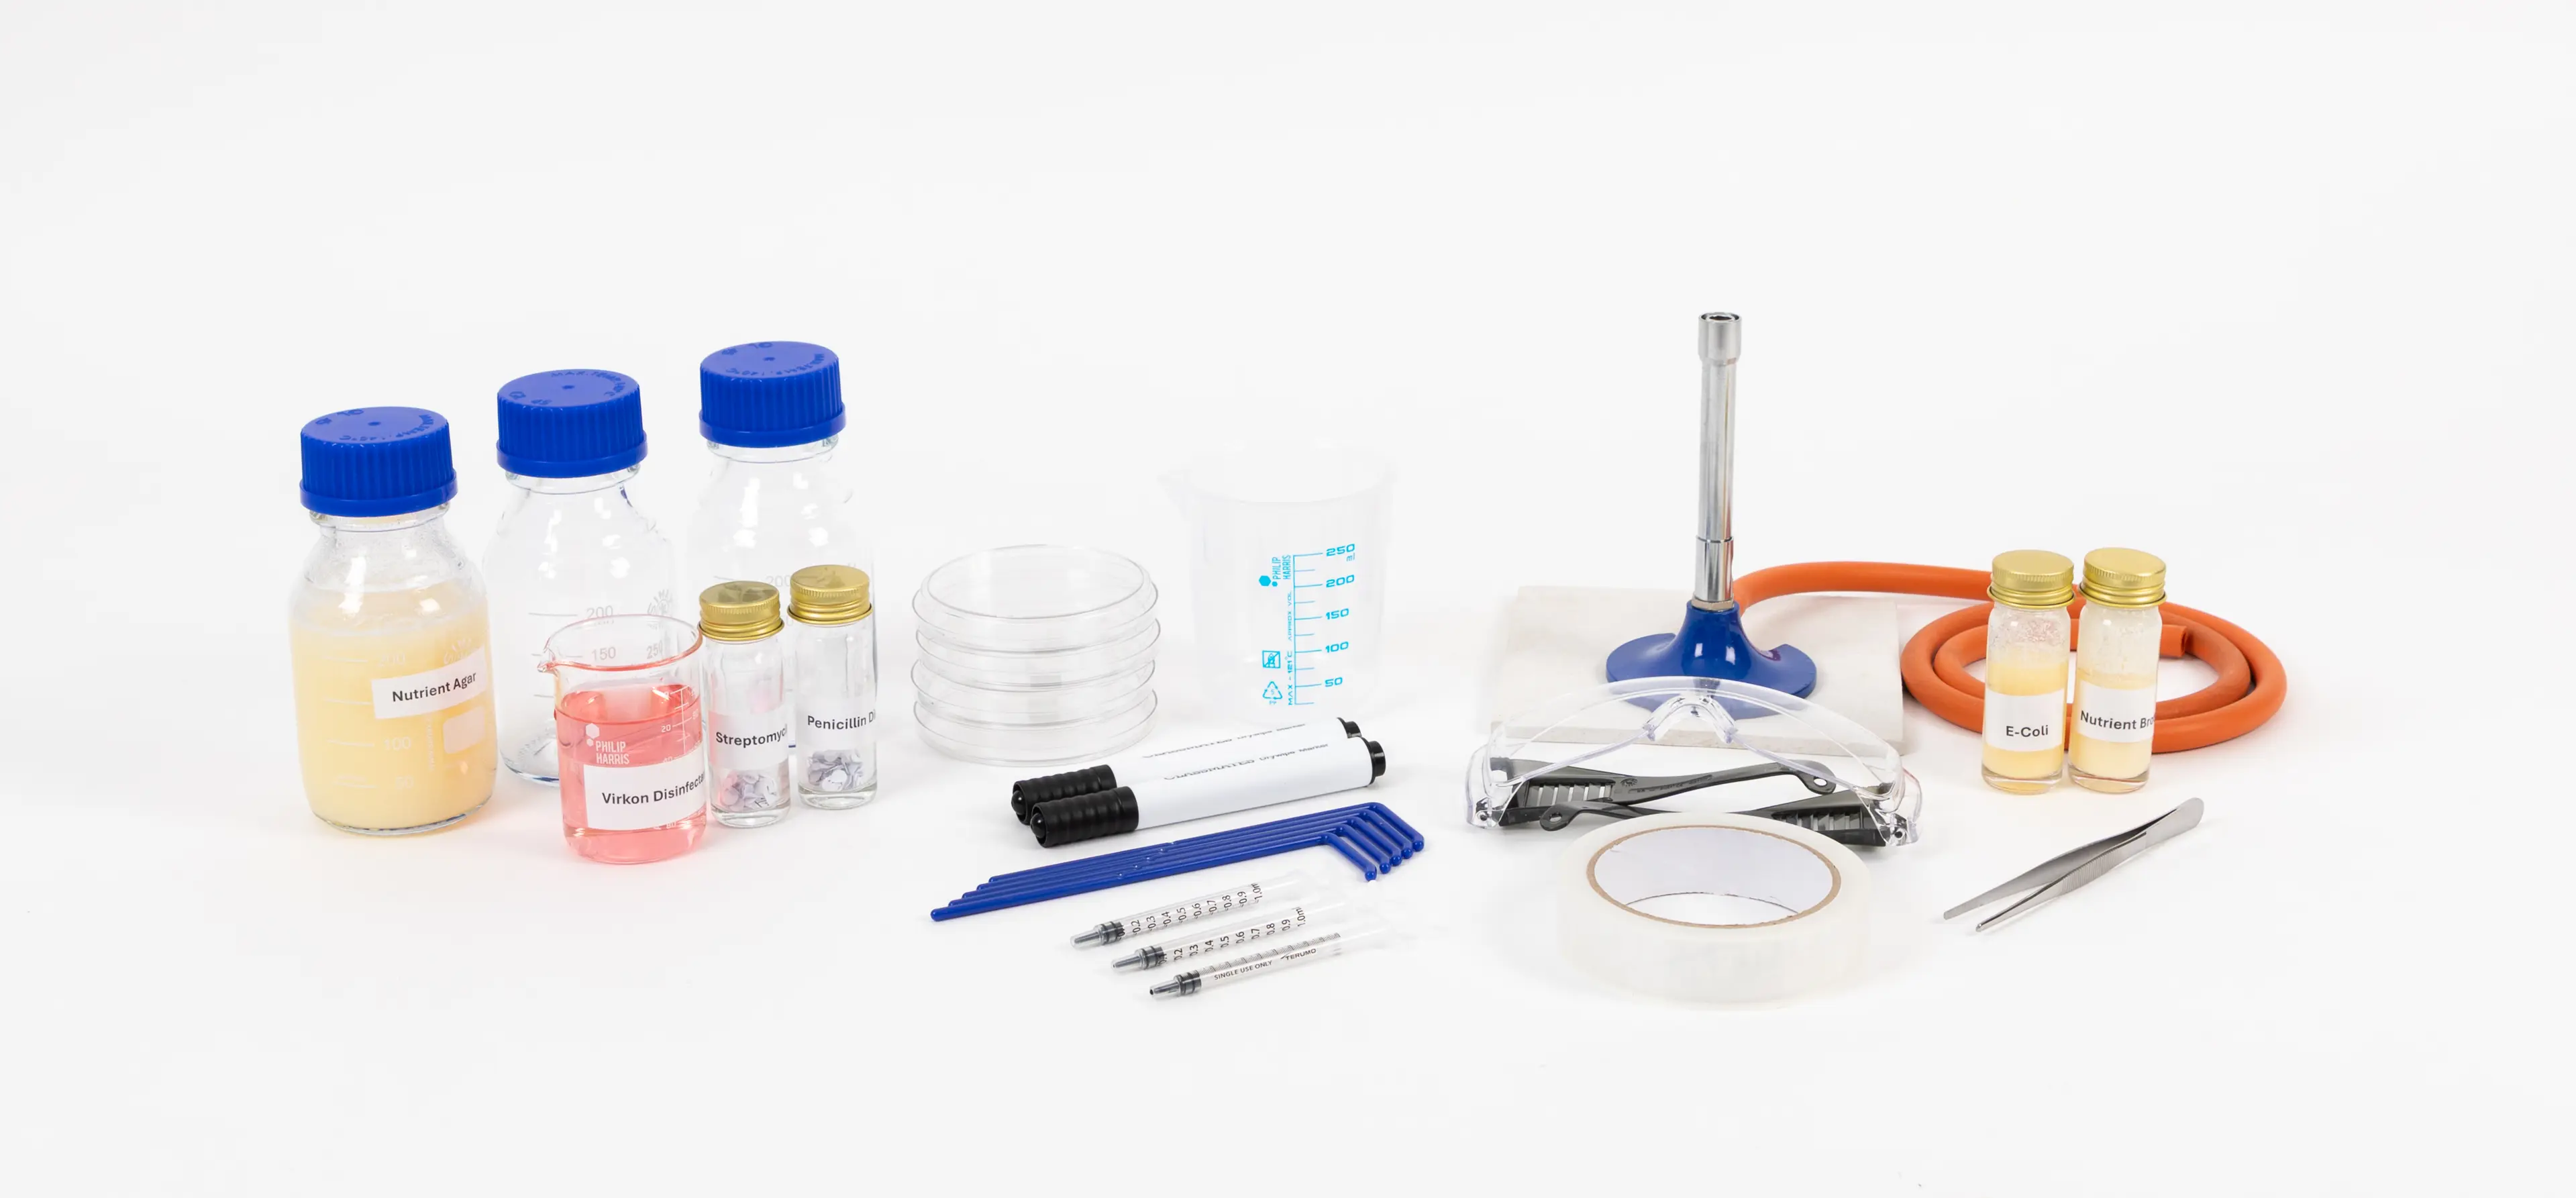
You will need:
Method
Lawn Plate Preparation:
Wearing gloves, students should clean the bench surface with Virkon Disinfectant, drying with paper towels.
Students set up and light a Bunsen Burner so that the yellow safety flame is in operation. They place the disinfected laminated sheet on the bench in front of the Bunsen Burner – this is now the students sterile working surface.
Students then place the following equipment onto their laminated sheet:
· Bottle of Bacterial Broth Culture
· Sterile agar plate
· Sterile Spreader
· Sterile 1ml Syringe
· Forceps
· Filter Paper Discs
· Discard Pot containing Virkon Disinfectant
Students also need access to a range of antimicrobial substances, a marker pen, scissors and sticky tape.
On the underside of the agar plate provided, students should label the plate sing the marker pen with their initials, class, date and name of the bacterial culture (E-Coli K12). The plate is divided into three sections and each is labelled with the antibiotic to be tested (if using Antibiotic Mast Rings, the plate does not need to be divided into sections).
The Bunsen Burner should now be switched to the roaring blue flame. This creates an updraught around the students’ working area. Students should now thoroughly wash their hands using hot water and liquid handwash/soap. They should dry their hands using paper towel.
Next, working as closely to the Bunsen Burner as is safe and possible, they should unwrap their sterile syringe and hold in one hand.
Their other hand should pick up the McCartney Bottle containing the Bacterial broth, removing the lid, but without putting the lid down onto the working surface. The open neck of the McCartney Bottle is then gently wafted through the blue Bunsen flame.
The sterile 1ml syringe is now inserted into the bacterial culture bottle and 0.5ml of the bacterial broth is drawn up into the syringe.
Without putting anything down on the bench surface, the open neck of the McCartney Bottle is again gently wafted through the blue Bunsen flame and the lid is replaced.
Students now need to open their agar plate slightly, just enough to insert the mouth of the syringe and the bacterial broth is ejected from the syringe onto the surface of the agar. The syringe is removed, the agar plate lid is closed and the used syringe can now be placed into the discard pot containing Virkon Disinfectant, ensuring that the disinfectant is drawn in to fill the syringe.
The agar plate lid again is opened enough for the student to insert the plastic spreader and use it to spread the bacterial broth so that is completely covers the surface of the agar. The lid of the plate is then closed again and the spreader is placed into the Discard Pot of disinfectant. The agar plate is now a bacterial lawn plate.
The lawn plate should now be left for 5-10 minutes to allow the broth to be absorbed into the agar surface.
Placing the Antibiotic Discs:
Students should now take the forceps and pass the end of them through the Bunsen Burner flame a few times.
Using the forceps, a filter paper disc is picked up and is dipped into an antimicrobial test solution. The disc is shaken to remove excess drops of the test solution and the lid of the bacterial lawn plate is lifted slightly. The filter paper disc is then placed in the correct area of the plate (according to the labelling of the underside of the plate). The forceps can be used to lightly press the filter paper disc to ensure good contact with the agar surface is made. The petri dish lid is then closed, and the forceps are passed through the Bunsen Burner flame.
This process is repeated for each of the different antimicrobial substances provided.
If using an antibiotic Mast Ring, the procedure only needs to be carried out once.
Students can now use two small strips of tape to secure the lid of the lawn plate to the base. The students should use the scissors to cut the tape – they must not bite it! It should also be reinforced that the bacterial lawn plates need to have an aerobic environment to prevent the development of unwanted/harmful microbial cultures so the petri dish should not be completely sealed.
The students can now clear away their equipment as directed by the teacher in a manner which ensures the equipment trolley is safe for the technician team to collect and dispose of.
The laminated sheet the students have been working on can be placed into a tray containing Virkon Disinfectant.
Ensure all syringes and spreaders are placed into the Discard Pot containing Virkon Disinfectant.
All student lawn plates should be gathered into a tray together, the teacher should check these have all been sealed up correctly and the technician will monitor these whilst they are developing in the incubator.
All bacterial broths, and associated equipment should be returned to the equipment trolley.
Once the equipment is all packed away, students can wipe down the benches, wearing gloves, using Virkon Disinfectant. Students MUST now thoroughly wash their hands using hot soapy water before leaving the laboratory.
The lawn plates are then placed into the incubator in order to develop. The incubator should be set to 25°C – 30°C and the plates should be monitored for 24-72 hours, or until visible zones of inhibition can be seen.
Analysis of Zones of Inhibition:
Once the plates have been incubated, and visible zones of inhibition are seen on the lawn plate, the plates can be returned to the class for analysis.
The diameters of the zones of inhibition are measured and noted. The more effective the antimicrobial substance, the wider the diameter of the zone of inhibition.
During the analysis session, the incubated bacterial plates should be returned to the class, along with an autoclave bag, so that their bacterial plates can be placed inside once their analysis is complete.
Students should be reminded to thoroughly wash their hands using hot soapy water after handling the bacterial plates, before they leave the laboratory.
Possible Learning Extension:
Antibiotics of different concentrations could be used here for further investigation into the effect of the concentration of the antimicrobial substance on the growth of bacteria.
In this case, the antibiotic discs would be removed from their cartridges using the forceps as outlined above.
Students could also produce their own dilutions of one particular anti-microbial substance to further investigate the effects of concentration. Students would have the opportunity to further demonstrate their use of laboratory equipment by using serial dilution and the associated equipment.
Part 2: Measuring the effects of an antimicrobial substance on the growth of bacterial populations in a broth culture.
Method:
Students are provided with the following equipment:
· Marker Pen
· A4 Laminated Sheet (which has been sitting in Virkon Disinfectant - as used in Part 1)
· 1 x McCartney Bottle containing E-Coli Bacterial Broth
· 5 x sterile McCartney Bottles containing 9mls of sterile nutrient broth
· 10 x sterile 1ml syringes
· 5 x sterile spreaders
· 5 x sterile nutrient agar plates
· Discard Pot containing Virkon Disinfectant
· Bunsen Burner
Prepare the working area by cleaning the bench surface wearing gloves using the Virkon Disinfectant.
Students set up and light a Bunsen Burner so that the yellow safety flame is in operation. They place the disinfected laminated sheet on the bench in front of the Bunsen Burner – this is now the students sterile working surface.
The sterile McCartney Bottles containing Nutrient Broth are labelled using the marker pen with the following dilutions:
· 1/10
· 1/100
· 1/1000
· 1/10000
· 1/100000
The Bunsen should be switched to the roaring flame. Students then remove the lid of the McCartney Bottle containing the E-Coli bacterial broth and flame the neck of the bottle as they did in the previous part. Using a sterile 1ml syringe, 1ml of E-Coli broth is drawn up and the lid of the McCartney Bottle is replaced. Without putting the bacterial syringe down, the McCartney Bottle labelled 1/10 is picked up, and the lid is removed. The neck of the bottle is passed through the Bunsen Flame as before, and the 1ml syringe is inserted. The bacterial broth is ejected from the syringe into the sterile nutrient broth, the neck of the bottle is passed through the Bunsen flame and the lid is replaced. The syringe can be placed into the discard pot containing Virkon solutions, ensuring that the disinfectant is drawn up into the syringe. The McCartney bottle is gently shaken to mix the culture and it now contains a 1 in 10 dilution of the original bacterial broth culture.
The above step is repeated using a fresh sterile syringe, the 1/10 dilution bottle instead of the original culture and the 1ml aliquot is added to the McCartney bottle labelled 1/100.
This is then further repeated for the other dilutions required, ensuring the previous dilution is used to take the 1ml sample from to add to the next dilution.
On the underside of the 5 x agar plates provided using the marker pen, students should label the base of the plate (around the edge) with their initials, class, date, name of the bacterial culture (E-Coli K12) and the dilution.
Next, working as closely to the Bunsen Burner as is safe and possible, they should add 1ml of each of their diluted E-Coli broths to the relevantly labelled agar plate and spread the bacteria using the L-Shaped Spreader to cover the surface of the plate as they did in the previous part.
Once the lawn plate have been left to sit for 5-10 minutes, they can be sealed using two small pieces of sticky tape and can be incubated and monitored for 24-72 hours in an incubator set to 25°C – 30°C.
Analysis of Results:
After incubation, during the analysis session, the incubated bacterial plates should be returned to the class, along with an autoclave bag, so that their bacterial plates can be placed inside once their analysis is complete.
Students will need to choose a plate that shows a suitable number (20 -100) of non-overlapping colonies, then count the number of whole colonies that can be seen on each of their dilution plates. Each colony has been formed from one initial bacterium.
Calculate the number of bacteria in each cm³ of the broth dilution used to inoculate the plate.
Calculate the number of bacteria in each cm³ of the original undiluted broth culture that was incubated with an anti-microbial chemical. This is the population density.
The population density of the untreated broth culture should also be estimated, to see the effects of the anti-microbial chemical.
You can extend the activity by allowing each group in the class to carry out serial dilutions of broth cultures that have been treated in different ways with the anti-microbial chemicals.
Calculating the Population Density:
Once the students have identified the most suitable plate to count, count the colonies using a permanent marker to cross of the colonies as they count them.
It may be easier to count in sets of 10 or use a tally chart.
Count the individual colonies, if colonies have begun to merge then count these as 2 separate colonies.
Once you have the number of colonies the population density can be calculated using the following formula:
Number of Colonies x Dilution Factor = Population Density of the Sample.
Technician tips
Teacher and technician should work together to ensure the microbiology practicals are planned well in advance. Nutrient agar and broth can be prepared up to two weeks in advance and stored in the fridge after autoclaving. Subculturing of bacteria for in class use can take up to a week. The sterile nutrient broth should be inoculated 5 days before the practical session, incubated 3 days before, and a test streak plating should also be carried out 2 days before the session.
If possible, clean benches prior to and following the practical session – students will carry this out themselves if this is not possible.
All vessels should have the lids loosened before putting in an autoclave.
Using distilled water inside your autoclave will prevent the build-up of limescale.
All pressure vessels should be examined before every use to ensure gaskets are in place and there are no faults or damage to the pressure vessel. If faults or damage are found contact the manufacturer of the autoclave to see how best to proceed.
Autoclaves should not be overloaded. If large quantities of broth and agar are required, multiple small load runs of the autoclave should be carried out.
In order to comply with PSSR Regulations (Pressure Systems Safety Regulations 2000/2014) any pressure vessel used in schools requires a WSE (Written Scheme of Examination). Given the nature of the equipment, this needs to be completed by a competent person with engineering experience. Your autoclave manufacturer will be able to advise on the procedure for this. If the pressure vessel is used a lot, an annual service / inspection is advised. This could be planned in for collection and servicing over the summer break.
Nutrient Broth Recipe: 5mls per McCartney Vial. 13g of Nutrient Broth powder dissolved in 1 Litre of water. Stir to dissolve. Dispense into autoclavable vessels (e.g. McCartney Bottles) and autoclave at 120°C for 15 minutes. The broth should be left to cool to room temperature before inoculating each vial.
Nutrient Agar Recipe: 28g of Nutrient Agar powder in 1 Litre of water, heat with frequent agitation/stirring and boil for one minute to completely dissolve the medium – this can be done in a boiling water bath, or with short bursts of heating in a microwave. Dispense into autoclavable vessels (e.g. Simax Blue Cap Screw Top Bottles) and autoclave at 120°C for 15 minutes. The agar should be left to cool to approximately 45 - 50°C
Labelling the front of the incubator with the date, class, number of plates and position in the incubator can help when multiple classes have bacterial plates to develop at the same time.
In the absence of an incubator, the plates will still develop at room temperature, but may take longer than 48 hours.
All equipment that has been exposed to bacteria will need to be autoclaved after use. This includes syringes, spreaders and discard beakers.
Used bacterial plates need to be destroyed using the autoclave. The used plates are put into an autoclave bag. The bag must not be overfilled given the size of your autoclave. The top of the autoclave bag must be rolled down and open when inside the autoclave to allow steam penetration. The bag must also not be in contact with any steam vents on the underside of the autoclave lid. Once plates have been through the autoclave and the autoclave has cooled, they can be removed and left to one side to solidify. Once solid, the bag of plates can be put into a bin bag and placed into the normal refuse.
Work closely with the teaching staff to ensure that any Microbiology equipment and the trolley are put back together in a safe manner that will not cause any unnecessary risks for the technical team during the clean-up.


